This building, like every other, has a top, a middle and a bottom. The general construction of the thing is most easily broken down into these three categories.
The Top
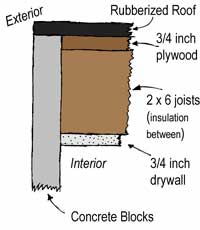
As shown on first diagram to the right, there are 4 different layers of stuff between the sky and the inside of the building. On top is rubberized roof, which we had replaced by professional when we first took the building over. Beneath that is something that really seems like plywood, but we haven't gotten a chance to take a good look at it. Next are the joists, made from 2x6 pieces of wood and spaced 16 inches off center. We installed rolls of R-19 insulation between the joists. Last is 3/4 inch drywall.
For what it's worth, we've spent some time walking around on the roof, retrieving lost tennis balls for Camacho. It seems pretty solid.
The Middle
We are lucky - although the building is near some neighboring properties, it is freestanding. Therefore, we didn't have to do any pain-in-the-neck construction mess to isolate the interior walls from the exterior ones.
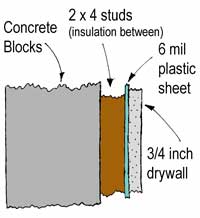
The exterior walls are 6 inch concrete blocks. The outside was treated with several coats of Drylock to keep it watertight. We installed 2x4 studs laid flat. The advantage to this was being able to use a powder actuated fastening tool - the really cool Hilti DX 36M. Made attaching the wood to the concrete a snap. The disadvantage was that insulation usually comes about 3 1/2 inches thick. Thus, we had to mash the insulation between the drywall and the concrete, making the drywall tough to get into place and losing some of the insulation value. Justin also made a big mistake in spacing the studs, but there's no need to embarrass him here.
We also put up a plastic moisture block between the studs and the drywall. The final layer is 3/4" drywall, bought in 10 foot lengths laid sideways. If we haven't put up a link on the resources page referencing Myron Ferguson's great book on putting up drywall, we should.
The Bottom
The floor will be the most complicated surface, excluding acoustic treatment. Justin really likes real wood floors (as opposed to the processed Pergo type). So that means a lot more work.
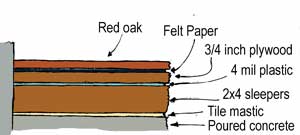
The poured concrete floor was pretty level, and so we decided not to do a final leveling fill. After washing it with a tri-sodium phosphate mixture, we covered the whole thing with a good layer of tile mastic, acting as the first moisture block. Next, we laid 2x4 sleepers down, spaced 16 inches off center. These were attached like the studs in the wall - using the powder gun. After putting insulation between the sleepers, we laid down a plastic sheeting over the whole thing and then screwed down the murderously heavy 3/4 inch plywood subfloor.
Finally, we put down tar paper (available in the roofing section of your local hardware store) then nailed in the red oak tongue and groove flooring. This was covered by three coats of polyurethane. We put this off until after most of the other finishing, as it doesn't make much sense to put down a nice wood floor and then spill paint all over it.
See? We think ahead.
|
 |
|
|
The Roof and Ceiling.
The Walls.
The Floor.
|
|
|
|
[ LATEST UPDATE ]
[ Archives ]
CONSTRUCTION
[ Overview ]
[ Basic Construction ]
[ Acoustics ]
[ HVAC ]
[ Electrical ]
[ The Grand Vision ]
[ Tool Reviews ]
[ Links and Resources ]
|